There's a barrage of summer classroom setup posts, photos, and videos to sift and scroll through when I check in on my social media, which is very much aligned with my own work calendar as I officially return to my library this upcoming week. I'm discovering new-to-me posts with educators and friends of education reminding colleagues and others that none of us should be giving our employers our work "for free" by returning to classrooms and libraries and labs and school buildings any earlier than our official report date.
Which I totally get.
At the beginning of my teaching career, I couldn't ever enter my classroom over the summers (unless I was teaching summer school within the same building). I was afforded some access during the weekends, and I could stay into the evenings during the weekdays if the night custodian was in the building. After Uncle Sam started moving our family from post to post, I was allowed "new-teacher-time" so I could see my teaching space, put my hands on curriculum materials, and deliver my own gear to be sorted and stored. Since arriving in this district, I've had access to my classroom space each summer after our incredible custodial crew has shampooed carpets and rugs, dusted nooks and crannies, and cleaned windows inside and out. I shared many a post at Kindergarten's 3 Rs describing not only classroom organization, space arrangement and decor decisions that I made during these before-contract hours, but also quick-peek photos explaining other tasks that a veteran teacher simply didn't have time to work through during the actual school year,
such as sorting through posters and bulletin board displays accrued over eighteen years of teaching.Could I have taken care of this job during the one and a half work days scheduled? Possibly, after scrambling through furniture arrangement, opening curriculum boxes, student materials prep, bulletin board displays, lesson planning, teacher mentoring, collegial hey-how-was-your-summer chit-chat, lunch, etc. but... likely not.
"Your classroom doesn't have to be a Pinterest/TikTok/Whatever showcase, you can just do the minimum" is also advice currently being shared by well-meaning folks.
Creating an inviting space that didn't terrify kindergarteners was my goal before social media existed. That's right, stuffed animals, my own picture books placed within easy reach, puppets, building blocks, paint, brushes and smocks, Play Doh, computers, beanbags, word walls containing students' names, pencils, crayons, markers, construction paper and glue, and letter and alphabet posters and toys ("manipulatives") were always part of my classroom set up and after get-to-know-your-teacher-day greatly influenced whether or not a child sobbed and screamed for their parents on the first day of school or bravely entered the classroom solo, quickly making new friends.
Photos providing a classroom tour were also added to our web page so incoming students and families could have a sneak peek before arriving. Hallway displays welcoming students to our classroom made it easy for five-year-olds to find our shared space as they became familiar with the building.
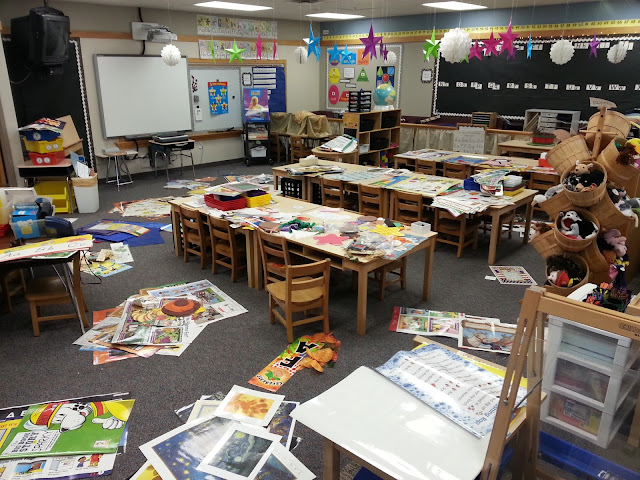
The week after school started, they and multiple surfaces within our classroom were covered with
student work, crafts, and creative constructions. Our space screamed to be shared, not only with those in our building daily but with our families who couldn't visit often, so I took photos and emailed them. To help other teachers and to document my own work for myself and my professional reflection, I shared pictures and ideas via the blog. I never became famous or trended, but college students and other new-to-service teachers reached out on occasion, asking to share my content as a resource. After a while, colleagues would tell me that they saw my craft idea or table arrangement on Pinterest. It was cool. But it wasn't my focus.
The bare minimum for many teachers has meant classrooms with damaged vinyl floors, empty bookshelves, peeling paint, no air conditioner, and few if any materials for student use. Despite districts' responsibility to provide for their students, it can often appear (for whatever reason) that their practice is to supply as little as possible and/or to allow retiring teachers to leave behind file cabinets bursting with outdated worksheets and cabinets full of "someday I'll need this" items, hoarded (yet unused) for decades. A single work day isn't going to cut it in these cases, and if you're a teacher with kids, coming in on the weekend during the school year isn't always feasible either. As inappropriate as it may be and may feel, sometimes we do take what we can get, so many of us spend unpaid time over summer break which we use for the most part to acquaint ourselves with our learning space in order to make it efficient, effective, and welcoming for students. Some classroom spaces need more work than others, and some look like they need an exorcism. I appreciate colleagues that rise to the challenge, and I sympathize with teachers who find themselves drowning in overwhelming seas of isolation.
I've spent three half-days in the library this summer, which is the least amount of time I've ever been in the building outside of the school year since joining my district sixteen (seventeen? Goodness, I've lost count.) years ago. Last summer I spent fourteen ten-hour days straight in the space because of the complete overhaul it needed. I'm certain that investment of energy and thought directly correlates to the small amount of time I've needed so far this year, though it was made necessary in the first place because the librarians before me didn't have the time to sort through all that they had inherited and should have purged before leaving. Would I have liked to have been paid for one hundred and forty hours of my time and effort or been recognized in some other way by administrators? Absolutely. Should I have been paid for the work? I believe so, but the applause during our first staff meeting had to be enough before I'd reap the eventual rewards that were to come throughout the year. While those rewards did not put food on my table, gas in my truck, or reimburse me for the thousands of dollars of my own money that I spent to get the space in order, the peace of mind I experienced in knowing that my students and I were as sure-footed as we could possibly be was worth it. During this time of COVID, in my starting this new job, having a sense of control served as a significant part of my self-care, but not every educator can find a silver lining or balance without actual income.
Before you think I'm representative of solely one side of a range of edu-issues, there is a facet of the current criticism of unpaid summer work that does resonate with me,
and it has for at least a decade now: zhushing classrooms rather than setting them up for mutual use by teachers
and students. Seeing so many classroom "transformations" that include wallpaper, paint, faux-foliage walls and boards filled with funky-font anchor charts and signage, and every surface covered with contact paper with no apparent areas left for student input, work, artwork, and creative contributions appalls me.
Seriously: pre-printed everything has become the new sage on the stage. When you leave no room (or only a single 3 X 5 board that you change quarterly) for student work/contributions,
you imply that you do not value their work, and you make it near impossible for them to reflect upon it, take pride in it, learn from others, and solicit and provide feedback to one another. As for the affirmation posters and anchor charts featuring cursive or other funky fonts that younger students C-A-N-N-O-T R-E-A-D and certainly cannot write being plastered all over doors and walls and bulletin boards and easels in primary classrooms?
Teachers downloading and reprinting or recreating from scratch every single printed element in their classrooms each August because they "must" have a different theme? No... no. That's not working smarter. And as for those companies who promote cute over substance (you know who they are, they're the ones that have you convinced to go out and buy ten vintage-looking candy jars so that you can run them across the top of a bookshelf and fill them individually with single colors of crayons so your students can "go and get the color that they need" when they've lost, or eaten, or broken, or whittled theirs...) they're not helping you (or your students, who need many opportunities to sort, classify, search, track, compare, evaluate, develop fine motor skills, and select) work smarter, either. A classroom's purpose isn't for social media accounts or to provide affirmations that your employer and/or colleagues might not be offering you. Your primary job as a teacher isn't to trend, it's to teach. Your space doesn't belong to only you, and your favorites don't appeal to everyone. Engage your students and provide them with a template or canvas, but put every tchotchke that speaks to YOU behind and on your desk, above your bookcase or file cabinet, and on the pinboard in your space where you can see it. Allowing students to have and contribute to their spaces, with their writing, coloring, and creativity frees up your time from decorating (and spending a lot of your money on) every available inch within your room. Define your "influence" by your contributions to education and your support of students and colleagues. Maybe you'll choose to share via social media, or only via in-building or in-district mentorship, too.
Whatever algorithm I toggled after searching for and viewing classroom and library decor on social media, it's been difficult to adjust in order to find more middle of the road, veteran educators such as myself. The "influencers" that my searches have shown to me aren't sharing some truly helpful, non-stylized teacher tips when considering your students' learning environment, such as:
- If you're able to plan for another year or three to five in advance, create organizational and instructional goals that you can work on over time.
- Ask a veteran teacher about the meat and potatoes, the substance of teaching and learning, and don't be surprised when they don't mention desert, jungle, rainbow, or beach color schemes.
- Your goals should be longer than your list of decor trending items that you're replacing every year.
- Take a week this summer to envision and build the foundation of the environment you will share throughout the year with other contributors (the students). You're going to need the time to arrange and rearrange.
- Sort, purge if necessary, and determine actual essentials, identifying the difference between needful things and wantful things.
- Give yourself an hour (or three) to make your own space comfortable and appealing to you. Your own space is your desk area, a bookcase, file cabinet, cabinetry, or shelving behind your reading table or in my case, the book repair room behind the circulation desk.
- If your job or placement might change after a year, invest in a neutral or simple theme, no unicorns, cacti, ninja, or rainbow characters overload.
- Next summer, take a day or a day and a half to do these same jobs, without having to recreate the wheel. Acquire over time, and keep and replace when necessary tried-and-trues.
Like most things in education, one size really doesn't fit all when it comes to how we value our time and one another. Should teachers ever have to work for free? No, yet we've had to for generations. Is it appropriate to advocate for ourselves? Yes, because the majority of us understand that being at our best benefits students. Finding what works for you without it depleting your life savings or negating any contribution by students is a reasonable back-to-school goal, which from my quick peeks at social media isn't necessarily what influencers seem to be advocating, nor a truth that all teachers naturally intuit.
*****