

You've set up your students' desks, centers, and other interactive learning areas first, so now it's time to display posters, pocket charts, photos, a word wall, artful inspiration, learning objectives, a schedule, and math and literacy tools. To save time throughout the year, commit specific display areas for year 'round focus. The staple board above our sink and painting area is always for my students' artwork, while the board above my math center always features posters, work done by students, graphic organizers and other examples of math concepts. Our circle/story time area features our calendar, days of the week, seasons, weather chart, and literacy unit props, along with often-used words on our word wall and vocabulary the students like to use in their daily writing and reading written on sentence strips.
Additional student work can be hung on the cabinet doors above the students' cubbies and out in our hallway for others to enjoy.
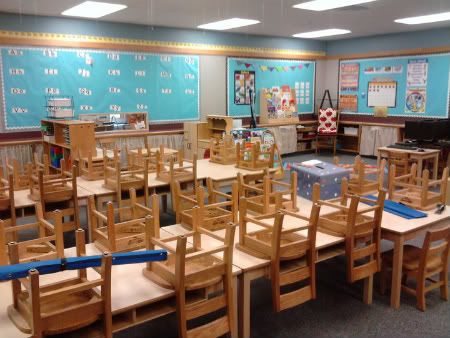
Last year, a Chicka Chicka Boom Boom coconut tree greeted students on our art wall during the first two weeks of school:


I love how the plain white border looks like ric-rac around the black and white checked trim, and the dotted punch-out letters add just the right *POP* to the display!
To place the prints and letters, I use clear push pins so I can reposition them as necessary:

Push pins allow you to move and tweak your displays with only one hole punched through your artwork/lettering. Once you have everything in place (and if your bulletin board materials are going to stay in place for a while), go back and staple each item, and remove the pins. If you change your artwork/learning tools weekly, you may want to use pins on their own- just make sure students can't reach them- pokey things can be quite intriguing and dangerous!
(To remove staples without ripping your students' work, your trimmers or posters, use a staple remover like this, instead of the old claw/chomper looking doohickie. WalMart and other office supply businesses sell both types, but the wand staple remover doesn't do nearly as much damage as the "jaws" remover.)
I'll share more photos as my room continues to come together!

I love your ideas, thanks for sharing! I get to get into my classroom on Thursday. I don't even know what it looks like yet so I'm anxious to get in there, and get started. I've already hit Targets 1$ bins for the goodies they have there.
ReplyDeleteAs teachers, so you get a budget for decorating your classroom, or is it all out of your own pocket?
ReplyDeleteI love your ideas. They are simple and colorful. Makes me want to go to kindergarten again! I certainly don't remember mine as being so pretty.
Do you always get to decorate your classroom so far in advance to the new school year?
ReplyDeleteI was offered a Kindergarten teaching job three weeks ago as my first real teaching job. I haven't been able to see a single classroom and so it is very hard to even plan how I'm going to set up the room. They tell me that August 16 will be the day I can start setting my room up but given the fact that school starts August 23, that's not a lot of time and I'm a bit nervous.
Hi there, and thanks for visiting! Webster, no, we don't get budget money for classroom decor such as borders, but if we can show that things like desk tags, handwriting charts, posters about shapes, or animals are aligned with our curriculum standards, we can use budget money for math/science/reading on those items. Knowing how to stretch one's dollar, create centers from recycled and donated materials, and track down useful items at the times they're available are all skills new teachers should master.
ReplyDeleteSilver Lining, no, we're not always able to get back into the classroom this early, usually because 1) we've turned in the keys to our classroom and 2) the custodial staff is in the process of cleaning (steam cleaning carpets, disinfecting furniture, removing ceiling tiles for dusting and vacuuming). This summer our tech dept. wanted input on where to put new computers, and the rooms in our hallway were cleaned first, so I've had access to the building. I've also set up early in anticipation of my husband's return from deployment.
If you only get a few days to set up your room, on day 1, take a friend, or two! Take your digital camera, all of your supplies (make sure your name is on everything that is your personal possession), and locate your room. Inventory everything quickly (furniture, curriculum sets, math/science/reading manipulatives) noting damage, if any. Roughly set up your room (computers away from water and magnets; student desks away from windows), stand back, and take some photos. Walk through it all- get down on your knees and take a look, since that's the height of many of your students.
At home on that first night, look over those photos. Imagine kids sitting at centers, working through the room, coming to circle/story time, etc. On day 2, tweak what you need to, and start your displays- open your kindergarten reading, math and science materials to find out what the first concepts covered will be (often colors, shapes, and certain letters). Use those concepts to dictate your bulletin boards. Don't have posters about shapes? Cut out large squares, rectangles, ellipses, circles, triangles, etc. in bright colors and hang them up. Bigger is better- easier to see, and makes a great display. Make sure you have a word wall that will stay up all year.
Day 3, rearrange whatever math manipulatives/center materials you have to the locations they'll be used. Unpack your own books and pretty items. Claim your personal space, your desk. You'll feel better if you put your desk off to the last because your students' space will already be taken care of.
On whatever day they're available, make sure to introduce yourself to your grade level colleagues and ask what common materials they suggest you buy/create. They might all make student journals, for example, so you'll need to ask for a pattern and find out where the book binder/laminator/paper supplies are located. They should also be able to tell you what school supplies the students will be bringing with them, so you'll know if each student will have his/her own pencil box or if you'll need to provide shared tubs for students.
Good luck, and have a terrific time with your new students!