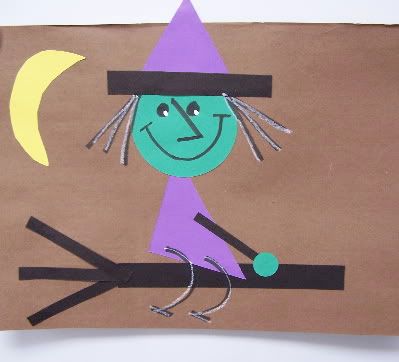
Dear Daughter had the day off from school today, so she spent time with me and my Super Stars in kindergarten. After sorting through my sticker stash, she found inspiration from an old Hallmark sticker shaped like a witch. Being a true "teacher's kid," she knew exactly where to find our school die cut machine and colored construction paper to mock up this simple Halloween art project.
While your scrap bin is the perfect place to find the bits and pieces necessary to assemble the witch, here's what we used to create the finished product above:
Background: brown construction paper (the big stuff...12X18 inches)
Face and hand: green construction paper (circle die cut- ours cuts both a large and a small circle with one punch; large=face, small=hand)
Witch's hat: purple construction paper (triangle die cut)
Hat brim: black construction paper; 3/4 inch by 6 inches
Witch's dress: purple construction paper; square die cut template cut in half to make a triangle shape. The right angle point is her rear end.
Witch's arm: black construction paper; 1/2 inch by 3 1/2 inches
Broomstick: black construction paper; 1 inch by 9 inches
Twiggy ends for broomstick: black construction paper; 1/2 inch by 4 inches, three pieces per child.
Crescent moon: yellow construction paper, drawn and cut freehand.
Use a black crayon or marker to make the witch's hair, facial features, legs and feet. Use a white crayon or dab of paint (a white-out pen works great!) to highlight the eyes, hair and legs.
*****
~ Martha shares I Scream Sandwitches....
~ More witchy goodness can be found over at owlsorts' post "Black and White and Dread All Over..."


What a great activity to review shapes, as well! I will have to do this one.
ReplyDelete