Saturday, July 27, 2013

Guidance from Quotes

Scrolling through some of my favorite quotes on Pinterest this morning, I realized many of them, regardless of their source, serve as sage advice for new-to-the-profession or new-to-the-grade early childhood/kindergarten teachers.


Kindergarten is often the first long-term sharing experience that children encounter.  Instead of siblings, twenty strangers compete with them every time they have a question, need some reassurance, or try to explore, create or rest uninterrupted.  Some students elbow their way to the front while others attempt to practice turn-taking etiquette.  There will even be students who shy away from what to them looks like a melee, their teacher swamped by more aggressive attention needers/seekers.  See the classroom through your students' eyes, reminding yourself of how you felt at situationally similar times, and gauge how they are feeling not just by observation, but by regularly asking them to share.


As students spend the year building friendships and cooperative skills with one another and their teachers, remember that the successfully managed classroom doesn't appear to others as a well-oiled machine because of the instant creation of compliant clones.  Is there a machine that is made up entirely of copies of the same, exact component?  Diversity will exist among your students just as it exists among your colleagues, students' families, and frankly, the rest of the world.  When necessary, be brave, accepting, and educate yourself so you can make respectful decisions that promote harmony.  


Do you like to be yelled at?  Keep the Golden Rule in mind as you teach your students how to work safely, effectively and kindly with one another.  "Whoever-is-the-loudest-wins" is often the framework for attention seekers at home, which is exactly why it doesn't work at school.  Since students regularly tune out their parents who yell, there's no reason to believe it will work for you.  Your voice is an essential classroom tool, already put to the test thanks to the germs that will be shared with you daily, so don't risk additional strain to your vocal chords or disturbing other classrooms.  Props such as bells, timers, chimes, rhythmic clapping patterns, a sing-song-y rhyme and music are great auditory triggers, and flicks of the light switch or a hands-up or other body signal help students learn to attend to visual prompts.  Teach your students two or three cues during the first week of school, and be consistent in using them.  Once everyone (or most) are onboard, teach one or two more.  An added bonus?  You'll be helping your students learn that their classroom and school are not only physically safe places to be, but emotionally protected spaces too.


A kindergartner once told me, "Teacher, I'm a great imaginator," and yes, she was!  Over the course of the year you'll not only address curriculum requirements and assess your students' skill development, you'll also need to provide opportunities for independent explorations and creative innovation.  "Imagination Stations" or "Creative Construction Zone" activities allow children to not only develop and practice skills but to innovate, problem solve, express gifts, learn from and teach one another.  

Make sure to regularly step outside of your own box as well.  Take up a hobby, visit other classrooms, follow your students' lead, and find inspiration that will help you avoid teacher burnout.  Seek out like-minded colleagues at work and from around the world via blogs, wikis and videos.  Adopt successful elements from grade level partners, collaborate on creating tools that benefit students, and offer to share discoveries and creations of your own. Teaching kindergartners and working with other education professionals should be an energizing and productive experience, not an unbearable ordeal, although...

I won't lie.  There might be moments, situations, possibly days when you'll find yourself wondering:


... at which point you'll either need to remind yourself to:


... or reconsider whether working with young children is the best fit for you.  Students, colleagues, and family partners in education deserve pleasant learning and working conditions.  Though occasional disappointments can arise and uncomfortable social undercurrents can exist, as teachers work together it's always appropriate to:


Have a great year!

*****

Some kindergarten sweetness I included in a treasury on Etsy:


Friday, July 26, 2013

Product Review: Crafts Keeper Organizer from SmileMakers

As a teacher, I've learned that good things often come in large packages!


SmileMakers sent me a colorful organizer for my Super Stars' writing center, and I'm terribly proud to say that it only took me six minutes to assemble!

Look at these cheerful colors:


The illustrated directions helped immensely:


Fold the flaps:


Slide in the dividers:


Secure the shelves with tabs:


And now for the drawers:


The outer box, dividers, shelves and drawers went together quickly thanks to the easy-to-follow directions, making the most difficult part of the process deciding ~where~ the organizer would be located.  How about here, according to the original plan as a writing center?


The drawers easily house pencils, dry erase markers and tracing cards, and the paper slots keep stencils, marker boards and various papers neat and tidy:


The thick cardboard easily supports two tubs full of clipboards without caving in or denting, which comes in handy when every inch of vertical storage space is precious.


Four drawers and ten paper slots could help my students learn how to organize their materials...

...unless I decide to use the organizer for our "crafternoon" storage:


Construction paper, multiple boxes of colored pencils, glue sticks, scissors and other materials easily tuck into the pull-out drawers and paper slots.

There was one drawback: for some reason the tabs on the drawers didn't want to stay tucked into their slots:


It's an easy fix if you have a glue gun!


SmileMakers offers all sorts of decor, learning tools, incentives/rewards, and organizational storage products online, which comes in handy: a teacher's load can be pretty heavy each day, so not having to tote catalogs between home and school helps.  SmileMakers also offers Teacher Perks, added savings, just for teachers. Teachers receive free shipping with any order of $49 or more or a $4.99 flat rate shipping with any order of $48.99 or less. Teachers get special private sales & free gift offers too!


Visit SmileMakers here: 


*****


Tuesday, July 23, 2013

Eighteen Years' Worth of Bulletin Boards

Ever wonder what eighteen years' worth of bulletin board materials might look like?


Whew.

Setting the goal for myself that I wasn't going to dig for materials this year, one of my last organizational chores for the summer was to pull the posters, calendars, charts and board decor out of the storage cabinet, sort through them all, thin them out, and group them by season, month and/or curriculum concept.  It took a few hours, but was worth it! 

I'll share a photo of what my bulletin board storage looks like (after the purge) in my classroom tour blog post, so come back soon!


Monday, July 22, 2013

Making Star Crayons

Oh, the goodies you find when you clean and reorganize storage areas in the classroom!  Case in point, two large baggies of broken and old crayons.  I'd saved them in order to melt them down and make new crayons, swirled, chunky and fun, but they got shoved to the back bottom shelf on my art cart.

The abyss.

I brought them home and settled into a comfy position so I could use a craft knife to peel the paper off of most of the crayons.  Leaving peach, brown and black out of the mix, I only needed one band-aid after the wrapper-slicing adventure.  Murphy's Law being what it is, I found tips on soaking paper-wrapped crayons in water to make removal easy AND safe after I had finished.  I also made a mental note that ~this~ year I'd be sure to have my Super Stars peel the crayons themselves: let's hear it for fine motor development!  After chopping the crayons up into 1/4 inch pieces, I waited for my oven to preheat to 275 degrees as I loaded up my oven safe (check those labels!) silicone baking pan:


I did *not* use any vegetable spray on the pan, but I did set it on top of a cookie sheet for stability.  If you don't have a sheet devoted to non-food craft use, cover your pan with aluminum foil to protect its surface from spills or sloshes.


It takes twelve minutes in my oven to get the crayons softened in the center and melted around the edges, but watch yours carefully so you can adjust the time as needed.  You don't want the crayons to melt completely.  Using a toothpick, gently push the semi-solid pieces down so that the completely melted crayon soup covers them, but don't stir or swirl: you'll lose the color.


As I only have one star shaped mold to use, I put both it and the baking sheet in the fridge for fifteen minutes, and then pop the crayons out before starting the next batch.


I'm not sure if I'll mount these on cards to give as gifts to my newest Stars this August, or if I'll keep them in a tub for one of our first art projects and/or rainbow activities, but they're bound to be a hit!

(A gallon size plastic bag of crayon pieces made over thirty chunky crayons.)


*****

More melted crayon inspiration can be found at:

~ The Popsicle Blog: Homemade Earth Crayons

~  EmmmyLizzzy: DIY Crayon Valentines (with a great tip about using water to soak off crayon wrappers!)

~ Feathers and Sunshine: Candy Crayons?


Wednesday, July 17, 2013

Happiness is Using a Desktop Laminator...

... in a classroom equipped with A/C.

Not much to see today, just lunch signs and our crate for returned library books.  ~And~ I learned something new:  Zip ties are cool little things!


*****

Some of the classroom chores I've checked off of my to-do list include:

~ Rearranging furniture to open up the front of the classroom
~ Sorting through and donating reproducible materials
~ Making new book tub labels
~ Sorting and prepping math manipulatives
~ Reworking my quarterly binders and giving them a facelift with new covers
~ Mapping literacy, math, science and social studies concepts and activities by month
~ Reading through and creating Pinterest boards for Common Core Curriculum Maps
~ Prepping Bulletin Boards
~ Organizing art supplies

I'd still like to find a place that will cut composition books in half for kindergarten journals and mini-books.  Does anyone have an idea of where I could take them that *wouldn't* cost an arm and a leg?  I've seen half-sized notebooks at Walmart in the back-to-school section, but I'd like to work through the stockpile of full size notebooks that I already have before making another purchase.

Tuesday, July 16, 2013

Bulletin Boards: Simple Considerations

You'd think that being a teacher and a paper crafter, I'd rock at scrapbooking.  After two years of producing my school's yearbook, one might guess I'd know enough tricks of online publishing templates to make putting photo albums, memory books or art journals together ~fun~.

But... no.

Give me a bulletin board though, and I can figure out all sorts of layouts and designs.  Suggest a theme and I will happily find or create some trim and anchor elements that will grab my students' attention and make them excited to create and share with all who might visit our hallway.

Apparently bigger is better for me.

*****

Artistry and layering know-how aside, there are rules regarding bulletin board displays, and these rules differ by district, school, and by fire marshal.  I've worked at a school that allowed teachers to cover every bit of staple board (as well as the classroom door and windows) with butcher paper before layering on trimmers, frames, and other design elements, and I've taught in a district that didn't allow any signs, mobiles or wall decor to be hung anywhere except on the one awkwardly placed bulletin board in the classroom.  It was also expected that emergency procedures, standards and our daily schedule would be displayed on the board before any student artwork could be featured.

Before tacking a single item to a wall or board, ask your colleagues or principal what limitations, rules, or policies are in place.

Rules change too.  When I began teaching at my current school, I would wheel the butcher paper cart down the hallway at the beginning of each school year and cover the hallway boards as well as many of the ones within my classroom.  Two years later, a new fire marshal determined that hallway boards and walls could only have twenty percent-ish of their surfaces covered by student artwork and displays, a tough rule considering that elementary students tend to work in 9 X 12 or 9 X 18 construction paper scale. Complying with safety standards, gone are the days of carefully selecting the perfect background color for a year's worth of bulletin board artistry.  But there's an upshot: time is precious for teachers, and for those of us who are too Type A to allow anyone else to manage our boards, a simple system or template works wonders.

Determine which boards or surfaces will house anchor elements such as the alphabet, number line, word wall, calendar (if you're not using an interactive whiteboard) year 'round.  Within my classroom, I've used black butcher paper for the background of my students' word wall, but simply trimmed other long-term elements with coordinating border.  I then decided where regularly rotated display areas could exist.  Artwork and projects can be tacked to staple boards, but they can also be mounted onto walls, closet/cabinetry doors, or (if allowed) hung from the ceiling.

Using coordinating trim throughout the room helps to create visual borders for learning areas and displays.  I've left two areas paper and border-free though, because I would like the option of using some holiday/seasonally matched trimmer if the mood strikes during the year: the board above my sink, near the painting and play dough center, and near the calendar and class library area, where literacy-related artwork can compliment the decor.

See the bare board near the window (it's partially obscured by a magnet board and set of trays at the moment)?


Here's the board above the sink.  I bet you can guess what one of our first art projects will be:


I promise I'll give you a photo-tour of the layout before I'm back to work full time, but until then, let's check out the simple hallway display... and when I say it's ~simple~, I mean it's **simple**.

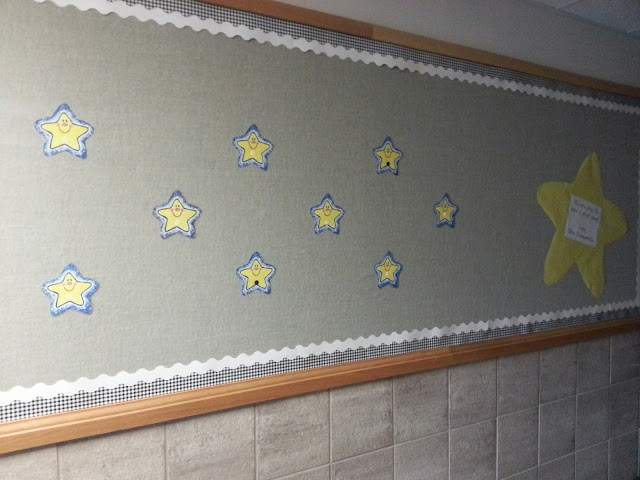
How can a nervous kindergartner orient himself/herself while learning how to navigate the hallways?  By finding a recognizable symbol, a super star:


Our hallway is shared with kindergarten, first, and second grade classrooms, so there are bound to be many colorful and engaging displays welcoming students on the first day of school.  I simply want our classroom's location to be easy to spot or describe to others if lost.

I first found a cute clip art star online and enlarged it on my SMART Board (locking the image in place helps) and traced it onto yellow butcher paper:


I printed out "Twinkle, twinkle little Stars, I wished for you and here you are" and "We are going to have a great year!  Love, Mrs. Sommerville," and added the text to each star. 


Smaller "kid drawn" stars with hook and loop tabs are where my students will find their names once I have my class list.


The boards are trimmed with solid white and black and white gingham, a combination that worked well last year.

It's ~very~ plain, and I understand that it might not appeal to many adults who prefer layers upon layers of scrapbooking-type magic, but its primary purpose the first week of school is to mark our area, our actual physical location for my students.  Considering that one of our first big projects is self-portraiture, I also don't want to put a lot of time and energy into the hallway display just to take it all down five days later to prep it for actual student artwork.  Saving time during board swap-outs is an essential teacher trick for working efficiently and keeping your weekends for yourself and your family. 

*****

Need some bulletin board inspiration?  Check out Pinterest!

Friday, July 12, 2013

Summertime Classroom To-Do List: New Labels for Book Bins

After two years of use, the labels on the book bins that my students use in our library area were looking a bit worse for wear.  Bent, rolled, and two of them ~somehow CUT~, it was time to make new ones.

After tracking down free clip art on line, I pasted images into a Word document and added categories so that my Stars would know which bin contained books that suited their interests.  After printing out the clip art and text together, I cut them out and added them to the center of activity cards that match much of my classroom decor.  Not tech savvy, I know, but sometimes "old school" is just as easy!  

Then I used my desktop laminator:


My tubs have hook and loop patches on them so that I can change labels as needed during the year:


My tubs aren't full in August as I like to model and have my students practice respectful and responsible book handling.  I start each school year with the following categories/genres:  ABC Books, Animals, Colors, Fairy Tales, Family, Friendship, School, and Super Star Books (student-made stories).


With new labels made, I get to check one more thing off of my summertime to-do list!

*****

If you prefer ready-made, printable book labels, check these blogs:

~ Lyndsey at A Year of Many Firsts shares FREE book bin labels

~ Teacher Laura at Kindergarten Adventures made book bin labels AND sticker sets (also freebies!)

~ ... and Leslie at Kindergarten Works explains her book tub system and provides printables, along with a great tip on how to use paint-stir sticks to organize book storage.

*****

~Michaele~